Hi guys, recently I have reading an ebook on O’reilly, the ebook is called Cybersecurity Ops with Bash. It teached us how to write bash script and show how bash script can be used in both offensive and defensive. I have the link below if you want to get the book from Amazon or O’reilly. I will also link the author’s github below, where he has all the scripts.
In the coming series of blog post, I will be posting workshop solution of this book for Defensive Security Operation (Chp. 5 to Chp. 12). The Pentesting with Bash (Offensive side) will be coming soon 🙂
Note: This is only workshop solution, NOT A SUMMARY OF DEFENSIVE BASH!!!
Before you read the workshop solution, it is good if you have read the foundation chapter of the book, so it gives you an idea and skills to write bash script, also doing the workshop first.
++++++++++++++++++++++++++++++++++++++++++++++++++++++++++++++
Chapter 5 Data Collection
- Write the command to search the filesystem for any file named ‘dog.png‘
$ sudo find / -name “dog.png”
Description:
– ‘find‘ command based on man pages is to find files in directory hierarchy
– ‘/‘ is the root directory of Linux system.
– ‘-name “dog.png” ‘ the name of file to be found.
Thus, the entire command is to search for the file called ‘dog.png’ starting from the root directory and branching into the different directories. - Write the command to search the file system for any file containing the text confidential
$ grep -iRlw ‘/home/nash/bash_scripting/’ -e ‘confidential’
Description:
– ‘grep‘ prints line matching the pattern
– ‘-iRlw‘ & ‘-e‘ , ‘i‘ – ignore case, ‘R‘ – search recursive under the directories, ‘l‘ – output only the file name that matches with the pattern, ‘w‘ – match the entire word, ‘e‘ – regex pattern
The entire command-line is to search for files that contain the word ‘confidential’ under the path ‘/home/nash/bash_scripting/’ - Write the command to search the filesystem for any file containing the text secret of confidential and copy the file to your current working directory.
$ sudo find /opt/collection -type f -exec egrep -iRL ‘secret|confidential’ {} \; | xargs cp -t ~/bash_scripting
Description:
– ‘-type f‘ state the type to be regular file
– ‘-exec‘ : Execute command. Any output from ‘find’ is taken as an argument to the command until ‘;’ is encounter which means the end of the command. The string ‘{}’ is a substitution of the current file name being processed as an argument.
– ‘xargs‘ is to build and execute command from standard input. So it takes the standard input (grep command), to ‘cp’ as argument and execute the command.
– ‘cp‘ copies files and directories with option ‘-t’is targeting a specific directory. - Write the command to execute ls -R / on the remote system 192.168.10.32 and write the output to a file named filelist.txt on your local system.
$ sudo ssh username@192.168.10.32 ls -R / > filelist.txt
It will prompt for password, then input the password. - Modify getlocal.sh to automatically upload the results to a specified server by using SCP.
In the getlocal.sh (original), add the following code…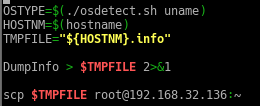
Basically copying the file to the current working directory of the server.
In my server,
- Modify hashsearch.sh to have an option (-1) to quit after finding a match. If the option is not specified, it will keep searching for additional matches.
In hashsearch.sh, add the following code after the mkabspath() function…
Description:
The ‘$#‘ is to count the number of arguments being passed to the bash script. If the argument passed to the script is more than 0, then if-else statement will check the first argument position ‘$1‘, whether it has the option ‘-1’.
So in the checking phase, I am using a substring expansion pattern of shell. Its format is ‘${parameter:offset:length}‘, in this code it shows as ‘${1:0:2}‘. Basically ‘1‘ is the position argument that is being passed, followed by the indexing ‘0‘ and the length of the characters ‘2‘.If the first 2 characters of the first position argument is equal to ‘-1‘, the variable ‘OCCUR‘ will become ‘1‘, in programming sense is return the value as ‘True‘. Followed by the command ‘shift‘, to push the following argument up by 1 position for e.g. position $2 will become $1.
After adding the if-else statement in hashsearch.sh, modify the while loop statement…

Since, the option is to ensure that shows the first match, we can do a simple ‘head -n 1‘ to ensure that one result returns only. - Modify the hashsearch.sh to simplify the full pathname that it prints out.
- If the string it outputs is /home/usr07/subdir/./misc/x.data, modify it to remove the redundant ./ before printing it out.
- If the string is /home/usr/07/subdir/../misc/x.data, modify it to remove the ../ and also the subdir/ before printing it out.
In the while loop statement, after the code written to echo out the pathname, pipe the echo to a sed command.

‘sed -e’ is to edit the file, here comes the juicy part. In between the aprostrophe you have start with ‘s‘ it is indicate substitute which means that matching occurences will be replaced with the intended text/character/space/special char etc.Then is it followed by the regular expression ‘/regex/‘, in this case is ‘/[\.\..]\//’, taking in the output as argument, it will searched for ‘./’ or ‘../’ in the pathname.
Note: if you were to indicate special character in the regex, please add a ‘\’ to escape special character in regex.
And since the purpose is to delete ‘./’ or ‘../’, you don’t need to indicate any space or character and just close it with ‘/’.
- Modify winlogs.sh to indicate its progress by printing the logfile name over the opt of the previous logfile name. (Hint: Use a return character rather than a new line.

Description:
Instead of using echo command that will print out every iteration in a new line, we can used the command ‘printf’ with ‘\r’ thus the printing out every iteration on the same line. - Modify winlogs.sh to show a simple progress bar of plus signs building from left to right. Use a separate invocation of wevtutil el to get the count of the number of logs and scale this to, say, a width of 60.

Description:
Basically pipe the output of wevtutil to pv tool, to help us to monitor the progress of counting the number of logs and output it into a progress bar. The options ‘-pt’ is to display the progress bar with timer and ‘-w’ is to indicate the width. - Modify winlogs.sh to tidy up; that is, to remove the extracted logfiles (the .evtx files) after it has tar’d them up. There are two very different ways to do this.

Description:
Assuming that I am running bash script in CYGWN, which is an environment run natively in Windows to run Unix-like program. I only came up with one method, if you have more leave a comment behind.
We have come to the end of Ch. 5 workshop solutions, I will be posting more solutions in the coming days. Hope you have a nice day 🙂
Author: Derek
REFERENCES:
